How to Create and Use a Restore Point in Windows 10
Turn on System Protection, create a Windows 10 restore point, and use System Restore when a driver, app, or system change causes problems.
System Restore lets you return Windows system files, registry settings, installed programs, and drivers to an earlier restore point. It is useful when a recent software, driver, or configuration change makes Windows unstable.
System Restore is not a replacement for a file backup, but normal personal files are not the primary target of a restore operation.
Windows 10 support note: Windows 10 reached end of normal support on October 14, 2025.
Turn on System Protection
- Open Start and search for Create a restore point.
- Open the result to display System Properties > System Protection.
- Select the Windows system drive.
- Select Configure.
- Select Turn on system protection.
- Use Max Usage to decide how much disk space Windows can use for restore points.
- Select Apply > OK.
There is no universal reason to force a fixed percentage such as 10%; choose a value appropriate for the available disk space.
Create a restore point manually
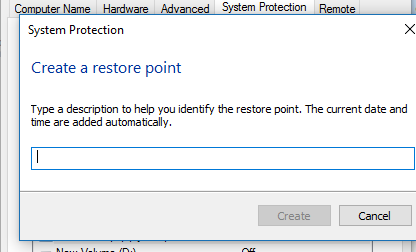
- On the System Protection tab, select Create.
- Enter a description that explains why you are creating the point.
- Select Create.
- Wait for the confirmation and select Close.
Restore Windows to an earlier point
- Open Create a restore point again.
- Select System Restore.
- Select Next.
- Choose the restore point you want to use.
- Optionally select Scan for affected programs.
- Select Next > Finish and confirm.
If Windows will not start, you can also open System Restore from Windows Recovery Environment under Troubleshoot > Advanced options.
Official references
Related posts
Browse all articles →
How to Batch Rename Files in Windows with PowerRename and PowerShell
Use Microsoft PowerToys PowerRename or PowerShell to preview and apply advanced bulk file-renaming rules in Windows 10 and 11.
How to Replace PowerShell with Command Prompt in the Windows 10 Win+X Menu (Historical)
Historical Windows 10 instructions for switching the Win+X menu from Windows PowerShell to Command Prompt. This setting does not describe the current Windows 11 menu.

How to Boot Windows 10 into Safe Mode
Step-by-step Windows 10 Safe Mode instructions using Windows Recovery Environment, including Safe Mode with Networking and recovery-media options.