Create a Custom Refresh Image in Windows 8 with Recimg (Historical)
Historical Windows 8 guide to creating and registering a custom Refresh image with Recimg.exe; this recovery model does not apply to modern Windows releases.
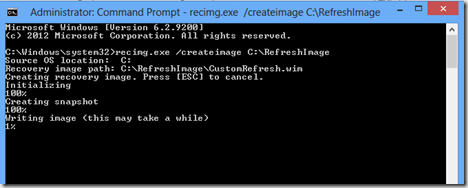
Historical support note: This procedure is specific to Windows 8. The
recimg.execustom Refresh-image workflow should not be treated as a Windows 10 or Windows 11 recovery method.
Windows 8 introduced Refresh your PC, and recimg.exe allowed advanced users to create a custom image that Windows could use during Refresh.
A custom Refresh image could include installed desktop applications and the system state represented by the image. It was not a complete personal-file backup and should never have been the only copy of important data.
Create and register the image
- Create a folder for the image, for example:
C:\RefreshImage- Press Windows + X and open Command Prompt (Admin).
- Run:
recimg.exe /createimage C:\RefreshImage- Leave the PC powered and allow the process to finish.
Windows creates a CustomRefresh.wim file and registers the new image for the Refresh feature.
Keep the image current
If applications changed significantly after the image was created, a newer image could be created so a future Refresh did not restore an unnecessarily old application state.
Important limitations
- This image is tied to the Windows 8 Refresh mechanism.
- It is not a sector-by-sector disk image.
- It does not replace a backup of documents, photos, and other personal files.
- Do not copy this procedure into Windows 10/11 recovery articles; those releases use different reset/recovery mechanisms.
Official/historical references
- Microsoft Q&A describing
recimg.exe /createimageon Windows 8: https://learn.microsoft.com/en-us/answers/questions/2692373/creating-a-custom-image - Microsoft Windows lifecycle status: https://support.microsoft.com/en-us/windows/deployment/updates-lifecycle/what-does-it-mean-if-windows-isn-t-supported
Related posts
Browse all articles →
How to Use Refresh Your PC in Windows 8 — Video Guide (Historical)
Historical video guide to Windows 8 Refresh your PC, including what it preserves and what must be reinstalled afterward.

Refresh Your PC in Windows 8: Repair Windows While Keeping Personal Files (Historical)
Historical Windows 8 guide to the Refresh your PC recovery feature and what it keeps, removes, and reinstalls.
Fix: Windows Recovery Environment (WinRE) Won't Open in Windows 10
Troubleshoot Windows 10 when Advanced startup or Windows Recovery Environment will not open, using supported WinRE checks and recovery media.