Refresh Your PC in Windows 8: Repair Windows While Keeping Personal Files (Historical)
Historical Windows 8 guide to the Refresh your PC recovery feature and what it keeps, removes, and reinstalls.

Historical support note: Refresh your PC was introduced with Windows 8. Current Windows releases use newer Reset/Reinstall workflows.
Windows 8’s Refresh your PC feature was intended for a system that had become unstable or corrupted but did not necessarily need a full wipe.
What Refresh changes
Refresh reinstalls core Windows components while attempting to preserve your personal files and selected settings. Traditional desktop applications generally need to be reinstalled afterward. Windows Store apps were handled separately by the Windows 8 recovery process.
Refresh is therefore not the same as restoring the machine to its exact factory state, and it should not be treated as a backup strategy.
Start Refresh in Windows 8
- Open Start and search for Refresh your PC.
- Open the recovery setting for Refresh your PC without affecting your files.
- Select Next.
- Read the list of changes carefully.
- Follow the on-screen instructions to begin.
If Windows cannot boot, the same recovery action may be available under Troubleshoot in the Windows Recovery Environment.
Before refreshing
Back up important files first even though Refresh is designed to preserve them. Also make sure you have installers/license information for desktop programs you may need to reinstall.
Official references
- Microsoft: Windows 8 Refresh/Reset behavior and recovery issue: https://learn.microsoft.com/en-us/troubleshoot/windows-client/performance/cannot-refresh-reset-pc-automatic-repair-fail
- Microsoft Windows lifecycle status: https://support.microsoft.com/en-us/windows/deployment/updates-lifecycle/what-does-it-mean-if-windows-isn-t-supported
Related posts
Browse all articles →
How to Use Refresh Your PC in Windows 8 — Video Guide (Historical)
Historical video guide to Windows 8 Refresh your PC, including what it preserves and what must be reinstalled afterward.
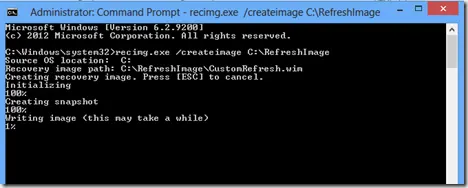
Create a Custom Refresh Image in Windows 8 with Recimg (Historical)
Historical Windows 8 guide to creating and registering a custom Refresh image with Recimg.exe; this recovery model does not apply to modern Windows releases.

Use DISM to Repair the Windows 8 or 8.1 Component Store (Historical)
Check and repair Windows 8/8.1 component-store corruption with DISM, then run System File Checker to repair protected system files.