Use DISM to Repair the Windows 8 or 8.1 Component Store (Historical)
Check and repair Windows 8/8.1 component-store corruption with DISM, then run System File Checker to repair protected system files.
- Applies to Windows 8
- 2 min read
- 5 steps
View article illustration

Historical support note: Windows 8 and Windows 8.1 are no longer supported by Microsoft. These commands are retained for maintenance of legacy systems.
DISM can check the Windows component store for corruption and, when a valid repair source is available, repair it. The DISM health options used here are supported on Windows 8 and later.
1. Open an elevated Command Prompt
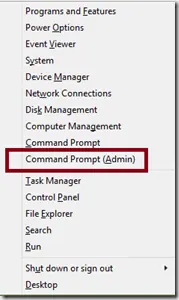
Press Windows + X and open Command Prompt (Admin) on the original Windows 8/8.1 interface.
2. Check whether corruption is already recorded
Run:
DISM /Online /Cleanup-Image /CheckHealthCheckHealth is a quick check. It reports whether the image has already been flagged as corrupted and whether that corruption is repairable.
3. Scan the component store
Run:
DISM /Online /Cleanup-Image /ScanHealthThis performs a deeper scan and can take several minutes.
4. Repair the component store
If corruption is found, run:
DISM /Online /Cleanup-Image /RestoreHealthBy default, an online repair may use Windows Update to obtain replacement files. If Windows Update is unavailable or DISM reports that source files cannot be found, use a matching Windows installation source rather than repeatedly clearing update caches.
5. Run System File Checker
After DISM completes successfully, run:
sfc /scannowSFC checks protected Windows system files and replaces damaged copies when possible.
Restart the PC after the repairs complete.
Official references
- Microsoft DISM repair options: https://learn.microsoft.com/en-us/powershell/module/dism/repair-windowsimage
Did this fix it?
This feedback stays on this page; it isn’t sent to us.Related posts
Browse all articles →
Fix: Windows Update Fails or Hangs in Windows 8 (Historical)
Historical Windows 8 troubleshooting for Windows Update failures, using restart, built-in troubleshooting, DISM, SFC, and clean-boot checks without unsafe blanket driver or antivirus changes.
Fix Error 0x800F081F in Windows 8.1 (Historical)
Troubleshoot Windows 8.1 error 0x800F081F when DISM or optional-feature installation cannot find the required source files.
Fix Error 0x800F0906 in Windows 8 or 8.1 (Historical)
Troubleshoot Windows 8/8.1 error 0x800F0906 when Windows cannot download files needed for a feature or component repair.