Use Windows Memory Diagnostic to Test RAM — Historical Guide
Guide to running Windows Memory Diagnostic on legacy Windows systems to check for memory errors, including Standard and Extended test options.
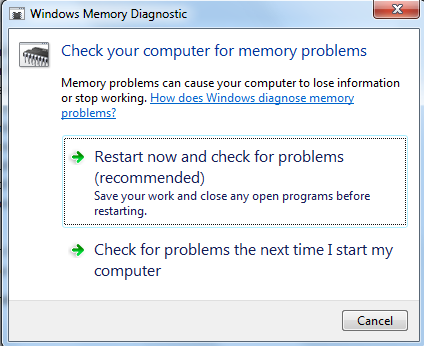
Windows Memory Diagnostic is a built-in memory test that can help identify defective RAM. The interface described here comes from Windows 7-era systems, but the mdsched tool continues to exist in current Windows.
Run the test from Windows
- Open Start and search for Windows Memory Diagnostic, or press Windows key + R and run:
mdsched- Choose Restart now and check for problems or schedule the test for the next restart.
- The PC restarts and the memory test runs before Windows loads.
Use the advanced test options
While Windows Memory Diagnostic is running, press F1. Depending on the Windows version, you can choose:
- Basic, Standard, or Extended test mix.
- Cache behavior.
- Number of passes.
Press F10 to apply the selected options and continue testing.
If Windows will not start
On Windows 7-era recovery media, memory diagnostics may also be available from the recovery/boot tools. The exact F-key boot menu varies by PC and should not be assumed to be identical on every machine.
Interpreting the result
A reported memory error is significant and should be followed up with hardware diagnostics or replacement testing. A clean pass does not guarantee that intermittent RAM, motherboard, or memory-controller faults are impossible.
Official reference
- Microsoft: Windows Memory Diagnostic workflow: https://support.microsoft.com/en-us/windows/experience/performance-optimization/how-to-fix-error-0xa-irql-not-less-or-equal
Related posts
Browse all articles →
SSD Performance Tips for Windows 8, 7, Vista, and XP — Historical Guide
Updated historical SSD guidance explaining AHCI, TRIM, Windows drive optimization, indexing, write caching, and what not to disable on modern SSD-aware Windows releases.

Fix 'USB Device Not Recognized' in Windows 7, Vista, and XP — Historical Guide
Historical USB troubleshooting for Windows 7, Vista, and XP, covering ports, hubs, power, drivers, chipset support, and device isolation.
Fix: Mouse or Touchpad Pointer Jumps While Typing in Windows 8, 7, Vista, or XP (Historical)
Historical troubleshooting for laptop touchpad cursor jumps, focusing on palm rejection, OEM drivers, sensitivity, charger interference, and hardware isolation.