How to Enable Hyper-V and Create a Virtual Machine in Windows 11
Enable Hyper-V in Windows 11 Pro, Enterprise, or Education, verify hardware virtualization, and create your first virtual machine without third-party software.
- Applies to Windows 11
- 3 min read
View article illustration
Hyper-V is Microsoft’s built-in hypervisor for running virtual machines on supported Windows editions. It is useful for testing operating systems, development environments, isolated labs, and workloads you do not want installed directly on your main PC.
Check your Windows edition first
Hyper-V is available on Windows 11 Pro, Enterprise, and Education-class editions. The full Hyper-V feature is not included with Windows 11 Home.
Open Settings > System > About and check Windows specifications before troubleshooting a missing Hyper-V option.
Check hardware virtualization
Open Task Manager, select Performance > CPU, and look for Virtualization. It should say Enabled.
If it says Disabled, enable Intel VT-x/Virtualization Technology or AMD-V/SVM in UEFI/BIOS. The exact name and location depend on the PC or motherboard manufacturer.
Enable Hyper-V from Windows Features
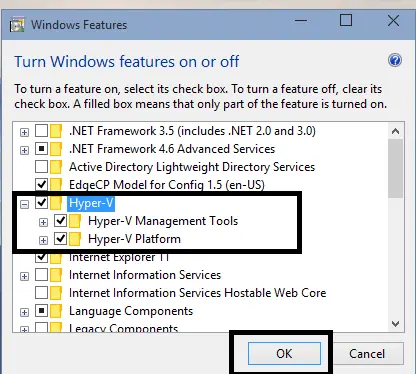
- Open Start and search for Turn Windows features on or off.
- Check Hyper-V.
- Select OK.
- Restart the PC when prompted.
You can also use an elevated PowerShell window:
Enable-WindowsOptionalFeature -Online -FeatureName Microsoft-Hyper-V -AllCreate your first virtual machine
Open Hyper-V Manager from Start.
- Select your PC in the left pane.
- Choose Action > New > Virtual Machine.
- Give the VM a name and choose where its files will be stored.
- Select the VM generation.
- Assign startup memory.
- Choose a virtual network connection if you already have a virtual switch.
- Create a virtual hard disk.
- Attach an installation ISO or choose to install the operating system later.
For modern 64-bit Windows and many modern Linux distributions, Generation 2 is usually the better starting point because it uses UEFI-based virtual hardware. Use Generation 1 only when the guest operating system requires legacy virtual hardware.
Create a virtual switch if the VM needs networking
In Hyper-V Manager, open Virtual Switch Manager. An External virtual switch allows the VM to reach the physical network through a selected network adapter.
Changing virtual networking can temporarily interrupt host connectivity, so avoid experimenting with switch settings during an important remote session.
Use checkpoints carefully
Hyper-V checkpoints let you capture a VM state before testing a risky change. They are useful in labs, but they are not a substitute for a proper backup of important virtual machines. Long checkpoint chains can also consume substantial disk space.
Secure Boot inside Generation 2 VMs
Generation 2 VMs support virtual UEFI and Secure Boot. If a Linux guest refuses to start, check whether Hyper-V is using the appropriate Secure Boot template for that distribution before switching the protection off.
How much RAM and disk space should you assign?
Do not allocate nearly all host resources to the VM. Windows itself still needs memory, CPU time, and storage. Start conservatively and increase resources only when the guest workload requires it.
Hyper-V and WSL are different tools
WSL 2 is optimized for an integrated Linux development experience. Hyper-V is the better choice when you need a complete guest machine with its own virtual disk, firmware, networking, checkpoints, and operating-system lifecycle.
Both use hardware virtualization, but they solve different problems.
Official references
Microsoft Learn — Install Hyper-VOfficial reference Microsoft Learn — Hyper-V hardware requirementsOfficial reference Microsoft Learn — Generation 2 virtual machine security settingsOfficial referenceRelated posts
Browse all articles →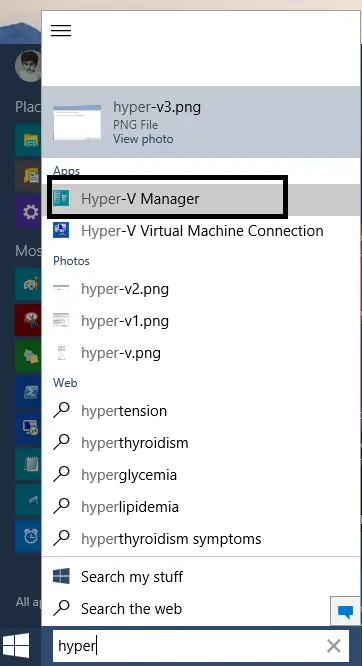
How to Create a Virtual Switch in Hyper-V on Windows 10
Create an external, internal, or private Hyper-V virtual switch in Windows 10 and attach virtual machines to the network you need.
How to Set Up Hyper-V in Windows 10 Insider Preview (Historical)
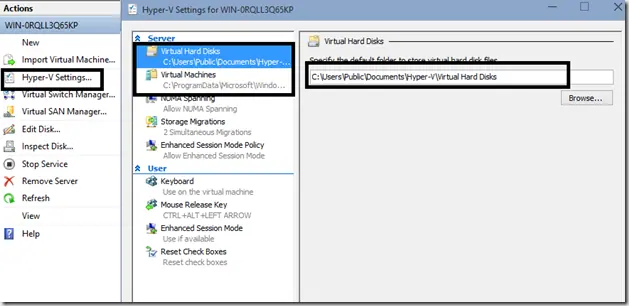
A historical Windows 10 Insider Preview guide to opening Hyper-V Manager, connecting to the local host, and configuring default virtual-machine storage paths.
How to Enable Hyper-V in Windows 10 Technical Preview (Historical)
A historical guide to enabling Hyper-V in the Windows 10 Technical Preview, with current Hyper-V requirements included for context.