How to Enable the Built-in Administrator Account in Windows 8.1 (Historical)
Enable the built-in Windows 8.1 Administrator account only when necessary, set a strong password, and disable it again after troubleshooting.
Historical support note: Windows 8.1 reached end of support on January 10, 2023.
Windows includes a built-in account named Administrator. Microsoft disables the built-in Administrator account by default during normal client setup and recommends leaving it disabled when it is not needed.
For routine administration, use your normal administrator account and approve elevation through User Account Control. Enable the built-in account only for a specific legacy troubleshooting or recovery need.
Enable the account through Local Users and Groups
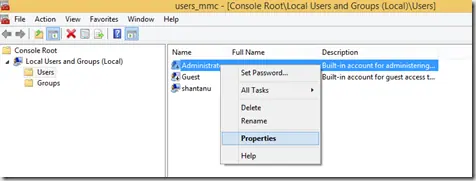
On Windows editions that include the Local Users and Groups snap-in:
- Press Windows + R.
- Type
lusrmgr.mscand press Enter. - Open Users.
- Double-click Administrator.
- Clear Account is disabled.
- Select Apply > OK.
Set a strong password before using the account.
The Local Users and Groups snap-in is not available on every Windows client edition, so this GUI method may not exist on a Home/Core edition.
Command-line alternative
From an elevated Command Prompt:
net user administrator /active:yesSet a password before signing in with the account.
Disable it again when finished
When you no longer need the built-in account, disable it:
net user administrator /active:noMicrosoft’s current security guidance recommends keeping the built-in Administrator account disabled when possible and limiting membership in the Administrators group.
Official reference
Microsoft local accounts and built-in Administrator guidance: https://learn.microsoft.com/en-us/windows/security/identity-protection/access-control/local-accounts
Related posts
Browse all articles →
Use DISM to Repair the Windows 8 or 8.1 Component Store (Historical)
Check and repair Windows 8/8.1 component-store corruption with DISM, then run System File Checker to repair protected system files.
Set Up and Sync a Microsoft Account in Windows 8 (Historical)
Historical Windows 8 guide to adding a Microsoft account and enabling the operating system's original settings-sync experience across Windows 8 devices.

Set Up a Second Screen or Multiple Monitors in Windows 8 (Historical)
Connect and configure a second display in Windows 8 using the Project/Second Screen controls and the Windows+P shortcut.